はじめに
こんにちは。スタディサプリのQAチームです。
皆さんは「非機能のテスト」をご存知でしょうか?
ざっくりと機能のテストはシステムが何をするかに対するテストで、非機能のテストはシステムがどう動くのかに対するテストのことをいいます。
皆さんの開発現場においても、まずテストをするとなると開発中のフィーチャー(機能)についてテストをするイメージを持たれると思います。開発の後期になってくると、バックエンドの性能やセキュリティを意識した非機能のテストの必要性を感じてくることもあるかもしれません。
では、実施することを検討すべき非機能の試験には俯瞰的にどのようなものがあるのでしょうか。今回はそのスーパーセットの紹介と、とりわけ障害許容性にかかるテストのノウハウについて紹介したいと思います。
なお、スタディサプリQAチームの特性を活かし、本記事については日英中3言語で記載します。より多くのオーディエンスに読んで頂ければ嬉しいです。
ISO/IEC 25010
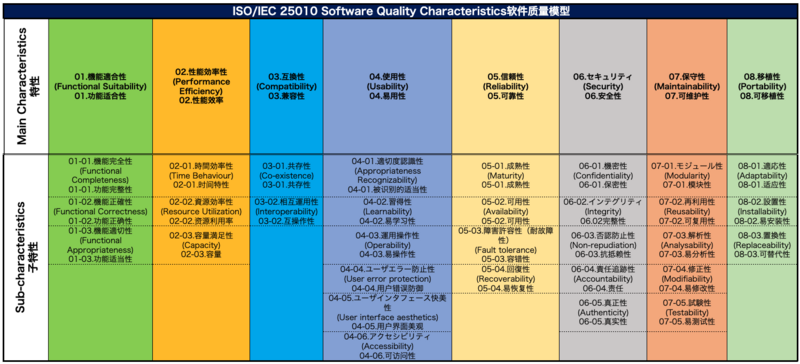
一概に機能や非機能と言ってもそれらが指す範囲が人や状況によって異なることがあります。これらのソフトウェア品質を指す言葉をISO/IEC 25010ではソフトウェア品質モデルとして標準化しています。
難解なようですが、これはつまりソフトウェアの品質全体をその特性ごとに細分化し、今ソフトウェアの品質のうちどこの部分を議論しているか共通の理解を持てるように使うことができるものです。
 たとえば、前述した機能テストに対応する品質モデルの中の品質主特性は
01.機能適合性 - Functional Suitabilityです。この01.機能適合性 - Functional Suitabilityの中でも更に副特性として詳細が細分化されていて、皆さんがぱっと想像される機能テストは01-02.機能正確性 - Functional Correctnessに該当します。また、前述した非機能のテストのうち性能に関係する品質主特性は02.性能効率性 - Performance Efficiencyです。この02.性能効率性 - Performance Efficiencyの中でもイメージがつきやすいのはAPIやDBのレスポンスタイムを測定する02-01.時間効率性 - Time Behaviourにかかるテストなのではないでしょうか。この品質モデルはシステムの要求を定義する際にも使用でき、各品質特性にかかるテストも設計できます。また、品質特性ごとに異なるテスト設計技法があります。この品質モデルを使用しシステムの要求やテストを定義することで、システムが大きな単位での要求漏れやテスト漏れを防ぐことができるようになります。この品質モデルはいわば、「システムとして考慮すべき品質観点のスーパーセット」です。
前章で紹介した通り、ひとくちに「非機能のテスト」と言っても02.性能効率性 - Performance Efficiencyに対するもの(たとえばストレステストやロードテスト)、03.互換性 - Compatibilityに対するもの(たとえばクロスブラウザやクロスOSテスト)、04.使用性 - Usabilityに対するもの(フォーカスグループやA/Bテスト)など、さまざまなものがあります。テスト対象となる品質特性に対するテストの方法もさまざまですが、今回はあまり馴染みのなさそうな05-03.障害許容性(耐故障性) - Fault toleranceに対する試験(障害テスト)について紹介したいと思います。
障害許容性テスト(障害テスト)
障害許容性テストとは、システムを構成するサブシステムやコンポーネントが意図しない状態に陥り動作しなくなった場合に、システム全体としてどのような振る舞いをし利用者にどのような応答を返すかを確認するテストです。そもそもシステムは停止しないように振る舞わなければならないので、まずそのようなことが起きてはいけません。しかしながら、ハードウェアやソフトウェアの不具合、オペレーションの人為的なミス、自然災害などの理由でシステムやシステムを構成するコンポーネントの一部またはすべてが停止してしまうことがあります。そのような時のシステムの振る舞いをあらかじめ確認し、発生時の対応を取り決めておくことが大切です。障害許容性テストは、そのような有事の時にシステムとして何が起こるのかを明らかにし慌てずに行動できる自信を与えてくれます。障害許容性テスト(障害テスト)の話をすると、Chaos engineering(test)のことを想像する方もいるかもしれません。ここで紹介する障害許容性テストはChaos engineering(test)とほぼ同義ですが、システムを構成するサブシステムやコンポーネントをランダムに落としていく性質のものではなく、より単体レベルのテストに近いです。Chaos engineering(test)を単体レベルの障害許容性試験の前に実施してもテストの再現性が低かったり不具合の原因の特定が困難になったりするため、ここでは単体レベルの障害許容性のテスト設計技法にフォーカスします。それでは具体的に障害許容性テストをどのように設計し実行するのかを見ていきましょう。
シーケンス図を描く
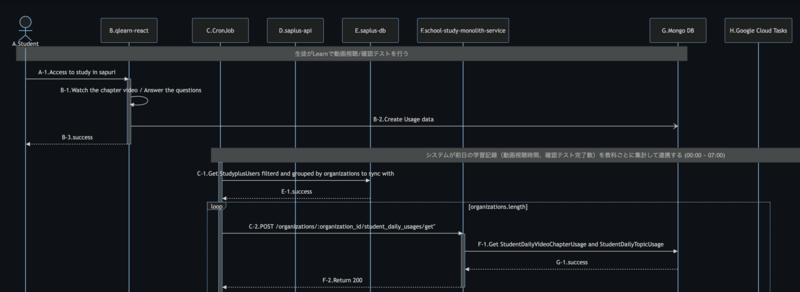
障害許容性テストを設計するに当たり、システムのシーケンス図が有用です。システムを構成するサブシステムやコンポーネントが明らかになり、それらのコンポーネントで発生する不具合がシステムのシーケンスのうちどの部分の処理に影響するかのヒントを与えてくれるからです。もしシーケンス図がなければラフに描いてみるのが良いでしょう。描いたものを開発担当者にレビュー頂くのがなお良いです。思い込みによって間違ったシーケンス図を描いてしまうと、的外れなテスト設計をしてしまうかもしれません。

シーケンス図にコンポーネントIDとシーケンスIDを付与する
シーケンス図が完成したら、登場人物となるコンポーネントとシーケンスにそれぞれ一意のIDを付与します。一意であれば何でも良いのですが、シーケンスIDについては当該シーケンスの起点となるコンポーネントIDを含めると理解しやすくなって良いでしょう。
FMEA(Failure Modes and Effects Analysis)を用意する
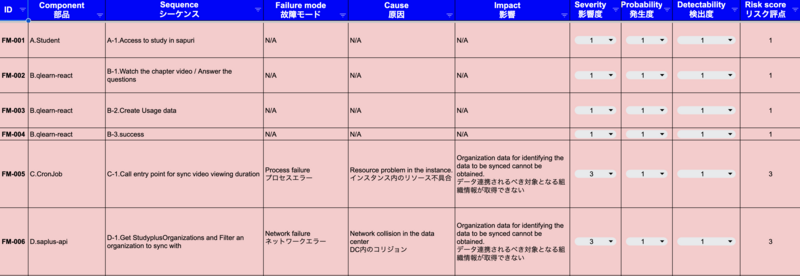
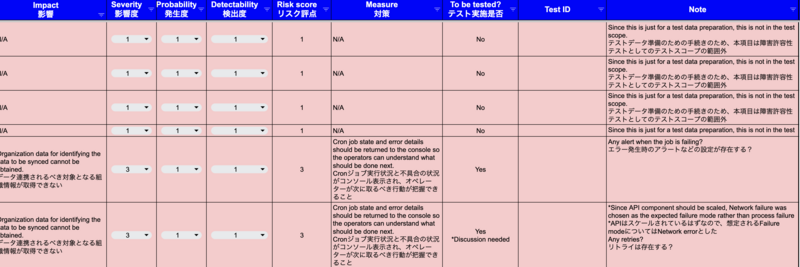
シーケンス図のすべてのコンポーネントとシーケンスに対し一意のIDを付与したら、これを元にテスト設計をしていきます。ここではFMEA(Failure Modes and Effects Analysis - 故障モード影響分析)というツールを使用します。FMEAは一般的にプロダクトやサービスの仕様・製造・組み立ての中にある潜在的な不具合を検出するためのプロセス分析ツールです。列方向には前項で一意のIDを付与したシステムを構成するコンポーネント、システムのシーケンス、故障モードとその潜在的な原因、インパクト(Effect)、影響度・発生度・検出度とそれらから算出されるリスク評点、(その故障モードに対し)現状どのような対策が取られているのかを記載します。
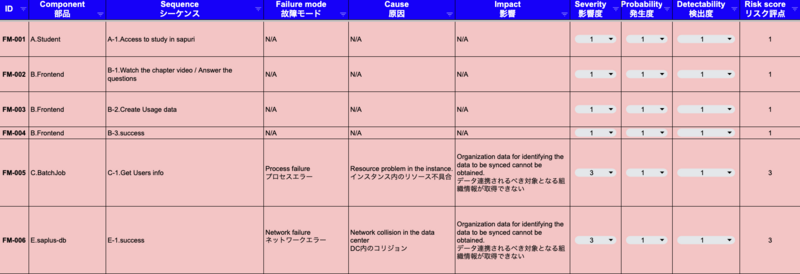

故障モード:故障の誘因となる欠陥です。潜在的なもの、顕在的なものを問いません。該当するコンポーネントまたはコンポーネント間のシーケンスにおいて想定され得る故障を誘発する欠陥を記入します。ここでどれだけ致命的で潜在的な欠陥を検討できるかが重要で、QAエンジニアの腕の見せ所です。
原因:故障モードで検討した事象の原因です。原因を明らかにすることでリスクを低減するための施策を検討することができます。
影響:故障モードで検討した事象が実際に発生した際の影響です。影響を明らかにすることで、影響を受ける側に対する施策も検討することができます。
影響度:故障モードで検討した事象が発生した際の影響の大きさをあらかじめ定義した段階(ここでは5段階)で評価します。
発生度:故障モードで検討した事象の発生しやすさをあらかじめ定義した段階(ここでは5段階)で評価します。
検出度:故障モードで検討した事象の検出のしやすさをあらかじめ定義した段階(ここでは5段階)で評価します。
リスク評点:前述した影響度・発生度・検出度に必要に応じて係数を掛け合わせ、リスク評点を算出します。ここでは影響度、発生度、検出度を掛け合わせてリスク評点を算出しています。テスト実施是非はこのリスク評点の大きさに基づいて決めてみても良いかもしれません。
対策:リスク低減のための施策です。
全てのコンポーネントとシーケンスに対する故障モードの検討が終わったら、詳細なテストステップを記述し実行していきます。中には埋め込むことが難しい欠陥(Fault injection)があるかもしれません。その際は開発者やSRE(Site Reliability Engineer)に相談すると良いかもしれません。何かしらの解決方法があるはずです。もし解決方法が見つからなければ、その故障モードの発生度は低いものかもしれません。費用対効果を考慮してテストの実施是非を検討することも可能です。以下にコンポーネント(Pod)のプロセスエラーを擬似的に発生させる例を紹介します。Liveness probeやReadiness probe等のHealth checkによりプロセスエラーを容易に発生させられなかった問題を解決しています。
while (true);
do
kubectl get pods -n [name space] | grep [pod name] | kubectl delete pod -n [name space] `awk '{print $1}'` --force
done;
Podを1台のみでスケールする設定をしてもらうように開発者に依頼し、QAエンジニアが無限ループの中でPod名を指定し強制削除するコマンドを発行しながら通常の業務フロー(UIの操作)を行い、システムが期待する動作をすることを確認しました。ネットワークエラーも同様に、実際に存在しないノードへ接続するように設定ファイルを書き換えたり、NIC(Network Interface Card)をDropしたりする方法が有効かもしれません。
Chaos engineering(test)との関係性
一般的にChaos engineering(test)は自動化された方法でランダムにコンポーネントを落としていくことが多いですが、前述した通りテストの再現性が低かったり不具合の原因の特定が困難になったりすることがあります。まずはコンポーネント単体レベルの障害許容性テストを実施した後、コンポーネントレベルの障害時に期待する動作が明らかになった上でシステムレベルのChaos testを実行することが効率的だと考えます。Chaos testを実行する際は受け入れテストレベル相当のUIのテストを自動化しておくことが有用です。どのコンポーネントに対するどのような障害が発生した時にどのビジネスロジックに問題が発生し、利用者がどのような不具合に直面するかを確認することができるからです。
おわりに
今回のBlogでは機能テストと非機能テストの違いと、非機能テストのうち特に障害許容性テストについて深掘りして紹介させていただきました。非機能テストで検出・修正される不具合については、機能テストのそれらのようにリリース直後には発生しないものが多く、その効果が見えづらいものかもしれません。しかしながら、将来的に発生し得る障害については発生直後の対応が困難なものもあり、被害が拡大してしまう恐れがあります。障害許容性テストはこのような事態にならぬよう転ばぬ先の杖のような性質を持っています。とりわけセーフティクリティカルシステムにおいては有用なテストですので、システムのコンテキストに合わせたテスト深度で実施されると良いでしょう。
Introduction
Hi there. We're Study Sapuri QA team.
Do you know about 'Non-Functional Testing?'
In simple terms, functional testing is to check what the system does. On the other hand, non-functional testing is to check how the system works.
When you test your application in your workplace, you may start with conducting test for features under development. And in the later phase of the development, you may feel necessities of non-functional testing to check backend performance or security.
Then, how many types of non-functional testing are there? Let us introduce the superset of non-functional testing and details of fault tolerance testing specifically after that.
In addition, this article will be written in 3 different languages utilizing traits of our team. We hope this article will be read by many audiences.
ISO/IEC 25010
When we say functionalities and non-functionalities in general, the meanings or the scope of them may be different depending on the people. To avoid the confusions, ISO/IEC 25010 defines the meanings or the scope of them as a software quality model.
This may look complicated but in the nutshell, this breaks software quality as a whole down into some software quality characteristics to clarify which areas of software quality we are talking about in our development.
For instance, for the functional testing mentioned in the previous section is associated with 01.機能適合性 - Functional Suitability. And more specifically, the main quality characteristic, 01.機能適合性 - Functional Suitability is broken down into 3 sub quality characteristics and when we talk about functional testing in general, this is associated with 01-02.機能正確性 - Functional Correctness. Then performance testing mentioned in the previous section as a part of non-functional testing is associated with 02.性能効率性 - Performance Efficiency (Main quality characteristic). For the sub quality characteristics under the main quality characteristic that you can easily imagine might be 02.性能効率性 - Performance Efficiency to measure API or DB response time. This quality model can be used when you define requirements and create test cases. There are several techniques to create test cases according to the quality characteristics. By defining your system requirements or test cases with the quality model, you can avoid the necessary requirements or test cases overlooked as a big chunk. So, the quality model is like a superset of quality perspectives should be considered for your systems.
As mentioned in the previous section, there are several non-functional testing like to check 02.性能効率性 - Performance Efficiency (e.g. stress testing or load testing), 03.互換性 - Compatibility (e.g. cross browser or cross OS testing), and 04.使用性 - Usability (e.g. focus group or A/B testing). There are several test techniques for each quality characteristic but in this time, let us focus on the 05-03.障害許容性(耐故障性) - Fault tolerance testing which might be minor for QA engineers.
Fault tolerance testing
Fault tolerance testing is to confirm how the system behaves and responds to the users when the sub systems or the components which consist the whole system are under unexpected conditions. Since the system has to be up and running all the time, the unexpected conditions shouldn't happen. However, part / all of the components or sub systems could be down due to hardware / software problems, misoperations, or natural disasters, etc. The system behavior or the controls under those conditions should be defined and confirmed beforehand. Fault tolerance testing gives us confidence to deal with the situation. Some may think chaos engineering (testing) when we talk about fault tolerance testing. The fault tolerance testing introduced here in this article is almost same as chaos engineering (testing) but it's closer to component level testing than system level testing because chaos engineering (testing) is more to kill components or sub systems randomly. So even if chaos engineering (testing) goes first and find any issues, it would be difficult to identify the root causes and it would also be difficult to replicate the same issue again. In this article, we will just focus only on the component level fault tolerance testing. So, now, let's dive into how to design and execute fault tolerance testing in the next section.
Draw sequence diagram
When you design fault tolerance testing, having sequence diagrams would be helpful. They give us architecture of the system and what components, or sub systems consist of the whole system. Furthermore, they would also give us hints to find any failures of a particular component affecting which of those components / sub systems and their sequence. If you haven't had the one yet, it would be good if you create a rough diagram by yourself. We would recommend taking review from developers in your team so that you can eliminate your assumptions. If you have any biases or assumptions which are different from facts, you may execute pointless tests.
Put component IDs and sequence IDs in the sequence diagram
When you finish creating the sequence diagrams, let's put component IDs and sequence IDs for each component / sequence. It can be anything but should be unique. And for the sequence IDs, it would be more readable and understandable if you include component IDs for the sequence IDs to clarify which transaction is now being focused. For instance, if you focus on a transaction from component ID 'A' to component ID 'B', the transaction ID would be 'A-1' or 'A-B-1'.
Conduct FMEA(Failure Modes and Effects Analysis)
After putting component IDs and sequence IDs for all the components and transactions, you would create test cases based on the sequence diagram. Here, in this article, FMEA(Failure Modes and Effects Analysis) would be used. Generally, FMEA is a process analysis tool which identifies potential failures in products or services. In the X axis, you would put component / sequence including IDs you put, failure modes, their potential causes, impacts (Effects), severity, probability, detectability, risk scores calculated by the severity, probability, and detectability, and the current controls for the failure modes.
Failure mode:Failure causes faults. the ways, or modes, in which something might fail. Failures are any errors or defects, especially ones that affect the customer, and can be potential or actual. Any failures considered for the component / sequence can be put here. This is where to show your QA skills to see how critical problems can be found.
Cause:Root causes for the failure mode. Measures to mitigate risks can be taken when you know the root causes.
Impact (Effect):Impacts (Effects) when the actual failure happens. Measures for the components which are affected by the failure can be taken when you know the impacts (effects).
Severity:Rating of the impact evaluated by the defined scale. In this article, the severity is evaluated on a scale of 5.
Probability:Possibilities that the failure happens. In this article, probability is also evaluated on a scale of 5.
Detectability:Detectability is a rating to see how easy the failure can be detected. In this article, detectability is also evaluated on the same scale.
Risk score:Risk score is a result of multiplication among severity, probability and detectability. A judgement that you actually test the item or not can be decided by the score.
Measure:Measures to mitigate risks.
Once you finish the test design for all the components and sequence, you would add more detailed test steps associated with the test cases and execute them following the steps added. There might be some cases that expected fault injections cannot be done easily depending on the system architecture. You may ask for help from developers or SREs to make it in that case. There might be a solution they have. Even if you already asked for help from them and it's still difficult to achieve, the failure mode which you're trying to inject may rarely happen. In that case, the judgement whether you test it or not can be decided considering the RoI. The below is an example where you can see how to resolve health check like liveness / readiness probe in our pods by scaling only 1 pod of the application and run the following command to repeatedly shutdown the component to intentionally simulate a failure. This would be one of the solutions to inject failures when you have some limitations.
while (true);
do
kubectl get pods -n [name space] | grep [pod name] | kubectl delete pod -n [name space] `awk '{print $1}'` --force
done;
*Only one pod is deployed when we tested and subscribe the command. In the infinite loop, the pod is repeatedly shutdown and while running the script, we just run a normal workflow (from the UI) to see if our system works as expected. Similarly, network error can be simulated by changing the configuration of the application to point at an unexpected node or by dropping NIC (Network Interface Card) of the hardware.
Relations with Chaos engineering(test)
Generally, chaos engineering (test) is to shutdown components randomly to confirm the application can be up and running as expected, but as mentioned in the previous sections, sometimes it's hard to replicate the exact same test again and hard to know the root causes of the problems once they happen. We think that starting with a component level failure testing to clarify the component level expected behaviors first to proceed to system level chaos testing would be more efficient. And before running chaos testing, we would also recommend automating acceptance level UI testing to see which component's failure affects which business logic and you can also see the actual consequence for the users.
Conclusion
In this blog, we introduced differences between functional testing and non-functional testing, and dived into fault tolerance testing as a part of non-functional testing. Benefits of finding issues in non-functional testing are sometimes difficult to see compared to the ones in functional testing because generally the non-functional issues don't happen right after releases. However, sometimes non-functional issues happened in the future can be difficult to address depending on data increase or technical debts, etc. Fault testing is to avoid falling into such situations. It's like a 'Prevention is better than cure.'. Specially we would recommend conducting failure testing for safety critical systems which may cause big critical incidents. And the depth of the testing should be decided by the context of your systems.
简介
大家好。我们是StudySapuri的QA团队。
大家知道什么是“非功能测试”吗?
简单来说,功能测试是去测试这个系统是做什么的,而非功能测试则是测试这个系统是如何运行的。
在大家的开发现场中,说到测试,首先想到的应该就是针对开发中的“功能”的测试。
到了开发的后期,可能会意识到,对后端性能和安全性的非功能测试也是必要的。
那么,从整体上看,非功能测试是什么呢?
这次我们将对非功能测试进行全面的介绍,特别是关于容错性测试的技巧。
此外,为了突出StudySapuri QA团队的特性,本文将以日英中三种语言撰写。希望能有更多的读者阅读到它。
ISO/IEC 25010
对于功能和非功能的范围,不同的人和情况可能导致理解有所不同。
在ISO/IEC 25010标准中,这些术语被作为一个质量模型,标准化了。
虽然看起来复杂,但这实际上是将软件的整体质量按其特性细分,以便能够在讨论软件质量时,对于“我们具体在讨论哪一部分的测试呢?”大家可以拥有一定的共识。
例如,前面提到的“功能测试”对应模型中的 01.功能适合性 - Functional Suitability。
在这个01.功能适合性 - Functional Suitability中,还可以进一步进行细分。
大家首先想到的功能测试对应的是 01-02.功能正确性 - Functional Correctness。
另外,“非功能测试”当中,关于性能相关的测试,对应的是 02.性能效率 - Performance Efficiency。
在 02.性能效率 - Performance Efficiency中,比较容易理解的是测试API或数据库的响应时间。
对应的就是 02-01.时间特性 - Time Behaviour测试。
这个质量模型也可以用于定义系统需求,并设计涉及各个质量特性的测试。
不同的质量特性也需要用不同的测试设计技术。通过使用这个质量模型来定义系统需求和测试,可以防止需求或测试的重大遗漏。
这个质量模型可以说是“开发一个系统,需要考虑的观点集合”。
如前章所述,所谓“非功能测试”包括了
1. 对02.性能效率 - Performance Efficiency的测试(如压力测试和负载测试)
2. 对03.兼容性 - Compatibility的测试(如跨浏览器和跨操作系统测试)
3. 对04.易用性 - Usability的测试(如焦点小组和A/B测试)
等多种类型。虽然测试对象的质量特性和测试方法各不相同,但这次我们将介绍一个大家可能不太熟悉的 05-03.容错性 - Fault Tolerance测试。
容错性测试
容错性测试是指在系统的一部分组件停止运行时,检查整个系统将如何表现以及对用户做出何种响应的测试。系统本应设计为不会宕机地运行,因此首先不应发生这种情况。然而,由于硬件或软件的故障、操作人员的人为错误或自然灾害等原因,构成系统的部分或全部组件都有可能会停止工作。提前确认在这种情况下系统的行为,并制定相应的应对措施是非常重要的。 容错性测试可以明确在紧急情况下系统会发生什么,使我们能够保持冷静并自信地采取行动。谈到容错性测试时,您可能会想到混沌测试(Chaos engineering)。这里介绍的障害容忍性测试与混沌测试(Chaos engineering)几乎是同义词,但不是随机关闭构成系统的子系统或组件的类型,而是更接近于单元测试。 如果在单元测试级别的容错性测试之前进行混沌测试,可能会因为再现率低,导致难以确定故障的根本原因。所以本文将重点介绍单元级别的容错性测试设计方法。接下来,我们将看看如何设计和执行容错性测试。
绘制系统架构(序列)图
设计容错性测试时,序列图非常有用。它可以明确构成系统的各个组件,并对“这个组件故障的话,会影响哪些处理”提供一些线索。
如果没有序列图,最好粗略绘制一下。让开发人员也帮忙确认一下画好的图会更好。
如果我们因为错误的假设而绘制了错误的序列图,可能会导致不相关的测试设计。
为序列图添加组件ID和序列ID
完成序列图后,为其中的所有角色,组件和序列分别分配唯一的ID。只要是唯一的就可以,在序列ID中包含起点组件ID的话会更易于理解。
准备FMEA(故障模式及影响分析)
为序列图中的所有组件和序列分配唯一ID后,我们将使用这些信息进行测试设计。
此处将使用FMEA(故障模式及影响分析)工具。FMEA通常是一个分析工具,用于在产品或服务的规格、制造和组装过程中识别潜在的缺陷。
在表格的列方向,我们需要填入系统组件、系统序列、故障模式及其潜在原因、影响(Effect)、影响程度、发生可能性、检出难易度以及从这些内容计算出的风险评估,以及(针对该故障模式)当前采取了哪些措施。
故障模式:导致故障的缺陷。无论是潜在的还是显现的都需要考虑。需要记录单个组件或多个组件间可能引起故障的缺陷。这里能够考虑到多少致命的潜在缺陷是QA工程师能力的重要体现。
原因:故障模式里提到的缺陷的原因。明确原因可以帮助考虑降低风险的措施。
影响:故障模式里提到的缺陷实际发生时的影响程度。明确影响程度可以帮助我们决定对受影响用户应该采取哪些措施。
影响程度:通过提前定义好的基准(这里是五个阶段)对事件发生时的影响大小进行评级。
发生可能性:通过提前定义好的基准(这里是五个阶段)对事件可能发生的频率进行评级。
检出难易度:通过提前定义好的基准(这里是五个阶段)对事件是否很容易被发现进行评级。
风险评估:通过将上述的影响程度、发生可能性、检出难易度相乘,并按需要加上系数来计算风险评分。这里是通过相乘这三者来计算风险评分的。我们也可以基于这个风险评分的大小来决定这个测试项是否要实施。
解决方案:为降低风险而采取的措施。
当对所有组件和序列的故障模式分析完成后,将编写详细的测试步骤并执行测试。其中可能存在一些难以模拟的缺陷(Fault injection)。在这种情况下,建议与开发人员或SRE(Site Reliability Engineer)协商,应该会有某种解决方法。如果找不到解决方案,那么该故障模式的发生可能性应该是较低的。 您也可以考虑成本,决定是否进行测试。
下面介绍一个例子,通过如Liveness probe和Readiness probe等的Health check办法,来模拟组件(Pod)的进程错误。
while (true);
do
kubectl get pods -n [name space] | grep [pod name] | kubectl delete pod -n [name space] `awk '{print $1}'` --force
done;
依赖开发人员将Pod只缩减至一台机器,QA工程师通过死循环发出强制删除Pod的命令,同时测试常规业务流程(UI操作),以确认系统是否按预期工作。
同样,网络错误也可以通过修改配置文件来尝试连接到实际不存在的节点,或者关闭网络接口卡(NIC)来测试,这些方法也是比较有效的。
与混沌测试Chaos engineering的关联性
一般来说,混沌工程(测试)经常采用自动化方式随机关闭组件。 但如前面提到的,这可能会因为测试的再现性很低,难以确定故障原因。 所以,我们建议在执行完单个组件的容错性测试,明确了组件级别故障时的期望行为之后,再执行系统级别的混沌测试。 执行混沌测试时,使用等同于验收测试级别的UI自动化测试脚本是可行的。
这样我们就可以得出结论:当某个组件,发生某种故障时,业务逻辑会出现哪种问题,用户将面对哪种缺陷。
结语
在这次的博客中,我们介绍了功能测试与非功能测试的差异,深入介绍了关于容错性测试的详细信息。非功能测试中发现和修正的问题,与功能测试不同,很多并不会在产品上线后立即发生,测试效果可能不容易体现。然而,这一类问题一旦发生可能就很难响应,并且影响范围可能也会逐渐扩大。容错性测试可以起到预防的效果,尤其是在安全系数要求较高的系统中,是一种非常有效的测试。因此,根据系统的具体特性,来执行适当深度的测试会是一个好选择!