スタサプ小中高を開発している Android エンジニアの@maxfie1d、@morayl とスタサプ ENGLISHを開発している Android エンジニアの田村です。
GitHub Actions(以下 GHA) はアプリをビルドしたりストアに配信したりすることに使えるのはもちろん、もっともっと色々なタスクを自動化することができます。本記事では Androidチームによる GHA を使った自動化レシピをご紹介します。
まずはスタサプ小中 Android版での取り組みを紹介します。
自動でラベルを付与する
2023年9月に リニューアルをしたスタディサプリ 小学講座をリリースしました。アプリとしてはスタディサプリ 中学講座 と同じで 1アプリ内に中学生向けの機能と小学生向けの機能があります。
コードは中学生向けの機能と小学生向けの機能で大きく original/ elementary/ という2つのディレクトリに分かれています。PRが中学のものか小学のものかが分かるようにこれまで手動で 中学 小学 というラベルを付与していましたが actions/labler を使用して自動化することができました。

以下のように labler を設定することで elementary/ ディレクトリ内に差分があるPRに自動で 小学 ラベルが付与されるようになります。中学も同様に設定しています。
# labeler.yml

小学:
  - elementary/**
中学:
  - original/**
自動ラベル付与のルールとして他に .github ディレクトリ内の差分には CI ラベル、拡張子が .graphql のファイルの差分には GraphQL operations changed ラベルを設定しています。
ちなみに開発メンバーも中学と小学で分かれています。そのためレビュアーの設定もこれまで手動で行っていたのですが、 コードオーナー を設定することによりレビュアーの設定も自動化することができました。手順について詳しくはドキュメントをご覧ください。
自動で自分自身をPull Requestのアサインに設定する
PR作成時にPRを作成した人を自動的にアサインする方法です。gh コマンド(GitHub CLI)を使用しています。Depandabot のように bot が作成するPRではスキップするのがポイントです。
自分自身をアサインするというちょっとした手間も一度自動化しておくと結構楽です。
name: Auto self assign

# ... 略

jobs:
  self-assign:
    name: Self assign
    runs-on: ubuntu-latest
    # Ignore dependabot
    if: github.actor != 'dependabot[bot]'
    steps:
      - name: Self assign
        # Document https://cli.github.com/manual/gh_pr_edit
        run: gh pr edit ${{ github.event.number }} --add-assignee ${{ github.actor }} --repo ${{ github.repository }}
        env:
          GH_TOKEN: ${{ github.token }}
ここからはスタサプENGLISH Android版の取り組みをいくつか紹介します。
ビルド時間のベンチマークを計測するマン
弊チームではビルド時間を定期的にCI上でビルド時間の計測を行っています。 計測を行ったら特定のIssueに追記して履歴を追えるようにしています。

CIを組むポイントとしてはキャッシュによる差分ビルドが走らないようにしながら、依存関係のDLの時間は省くことです。 ネットワークのスピードに左右されないようビルド時間を計測することが大事です。 また、ビルド時間の計測には Gradle Profiler を用います。
- name: Prefetch Gradle Dependencies
  run: ./gradlew --no-daemon :app:assembleDebug

- run: |
    curl -s "https://get.sdkman.io" | bash
    source "$HOME/.sdkman/bin/sdkman-init.sh"
    sdk install gradleprofiler 0.18.0
    gradle-profiler --benchmark build --scenario-file ./gradle/build.benchmark.scenarios --gradle-user-home $HOME/.gradle
ここまでで計測はできているので、結果をGithub Issueへ記載してみましょう。 若干煩雑な処理になるので、github-scriptを使って JavaScript で記述します。
- uses: actions/github-script@v6
  with:
    script: |
      const script = require('./.github/workflows/scripts/sync_build_benchmark.js');
      await script({ github, context, glob });
const fs = require('fs').promises;

module.exports = async ({ github, context, glob }) => {
  const today = new Date().toLocaleDateString();
  const marker = '--DB--';
  const issue_number = [記載したいGithub Issue番号];
  const issue = await github.rest.issues.get({
    owner: context.repo.owner,
    repo: context.repo.repo,
    issue_number: issue_number,
  });

  const records = JSON.parse(issue.data.body.split(marker)[1]);

  const benchmarkResult = await fs.readFile('./profile-out/benchmark.csv', 'utf8')
  const mesuredBuildTimes = benchmarkResult.split('\n').map(line => {
    if (line.split(',')[0].includes('measured build')) {
      return parseInt(line.split(',')[1])
    } else {
      return undefined
    }
  }).filter(Boolean)

  const min = Math.min(...mesuredBuildTimes)
  const max = Math.max(...mesuredBuildTimes)
  const average = Math.round(mesuredBuildTimes.reduce((a, b) => a + b) / mesuredBuildTimes.length);

  records.push({ date: today, min: min, max: max, average: average, times: [...mesuredBuildTimes] });

  const tableSection = `
| date | min | max | average |
| --- | --- | --- | --- |
${records.map(({ date, min, max, average  }) => `| ${date} | ${min} | ${max} | ${average} |`).join('\n')}
  `

  const hiddenDbSection = `
<!--
${marker}
${JSON.stringify(records)}
${marker}
-->
  `

  await github.rest.issues.update({
    owner: context.repo.owner,
    repo: context.repo.repo,
    issue_number: issue_number,
    body: `
# :app:assembleToeicDevDebug

${tableSection}
${hiddenDbSection}
    `,
  });
};
ここまで記述することで自動的にIssueにビルド時間が書き込まれて、客観的にビルド時間の増減を図ることができます。 もちろんCIマシンのスペックやCPU状況にも左右されるので、必ずしも毎回同一条件とは限りませんがある程度の参考にはなるかと思います。
Proguard に差分があるかをチェックするマン
Proguard(R8)周りの不具合や記述ミスはみなさんも一度は経験があるかと思います。 最近はライブラリ側でルールが組み込まれていることも多く、その場合基本的には意識する必要はないですが ライブラリアップデートによるルール変更があるということ自体に気づきにくくなっています。
自動ライブラリアップデート機構であるRenovateと組み合わせて、注意すべきライブラリアップデートか否かの判断材料の一つとして、弊チームではProguardルールの差分をPRに表示しています。

まず、アプリモジュールのproguard-rules.proに下記を追記すると指定した場所にルールが統合されたproguard-rulesが吐き出されるようになります。
-printconfiguration build/proguard-rules-full.pro
これをもとに差分を検出していきます。
- name: 現在のBranchのProguardを取得するためにAssemble
  run: |
    ./gradlew app:assembleToeicProdRelease

- uses: actions/upload-artifact@v3
  name: 現在のBranchのProguardを一旦ArtifactsへUpload
  with:
    name: proguard-rules-full.pro
    path: ./app/build/proguard-rules-full.pro
    retention-days: 1

- uses: actions/checkout@v4
  with:
    ref: develop

- name: develop branchのProguardを取得するためにAssemble
  run: |
    ./gradlew app:assembleToeicProdRelease

- uses: actions/download-artifact@v3
  name: 現在のBranchのProguardをArtifactsからDownload
  with:
    name: proguard-rules-full.pro
Renovateで生成されたPRに対して、上記のようなステップを組むとライブラリアップデート前後のproguard-rules-full.proが揃います。 これを元にPRコメントとして差分を表示してみます。JavaScript で記載していきます。
- uses: actions/github-script@v6
  with:
    script: |
      const script = require('./.github/workflows/scripts/run_renovate_post_r8_difference.js');
      await script({ github, context });
const { execSync } = require('child_process');
const fs = require('fs').promises;

module.exports = async ({ github, context }) => {
    // ./proguard-rules-full.pro は現在のBranchのProguard
    // ./app/build/proguard-rules-full.pro はdevelop branchのProguard
    const diff = execSync("diff ./app/build/proguard-rules-full.pro ./proguard-rules-full.pro -U 0 -a -B -w -I '#.*' || true").toString().trim();

    const body = `
## Proguardの差分だよ

\`\`\`diff
${diff}
\`\`\`
    `;

    await github.rest.issues.createComment({
        issue_number: context.issue.number,
        owner: context.repo.owner,
        repo: context.repo.repo,
        body: body
    });
};
仮にProguardルールに起因する問題が発生した場合も、差分を見ることでライブラリ側の問題にも気づきやすくなります。
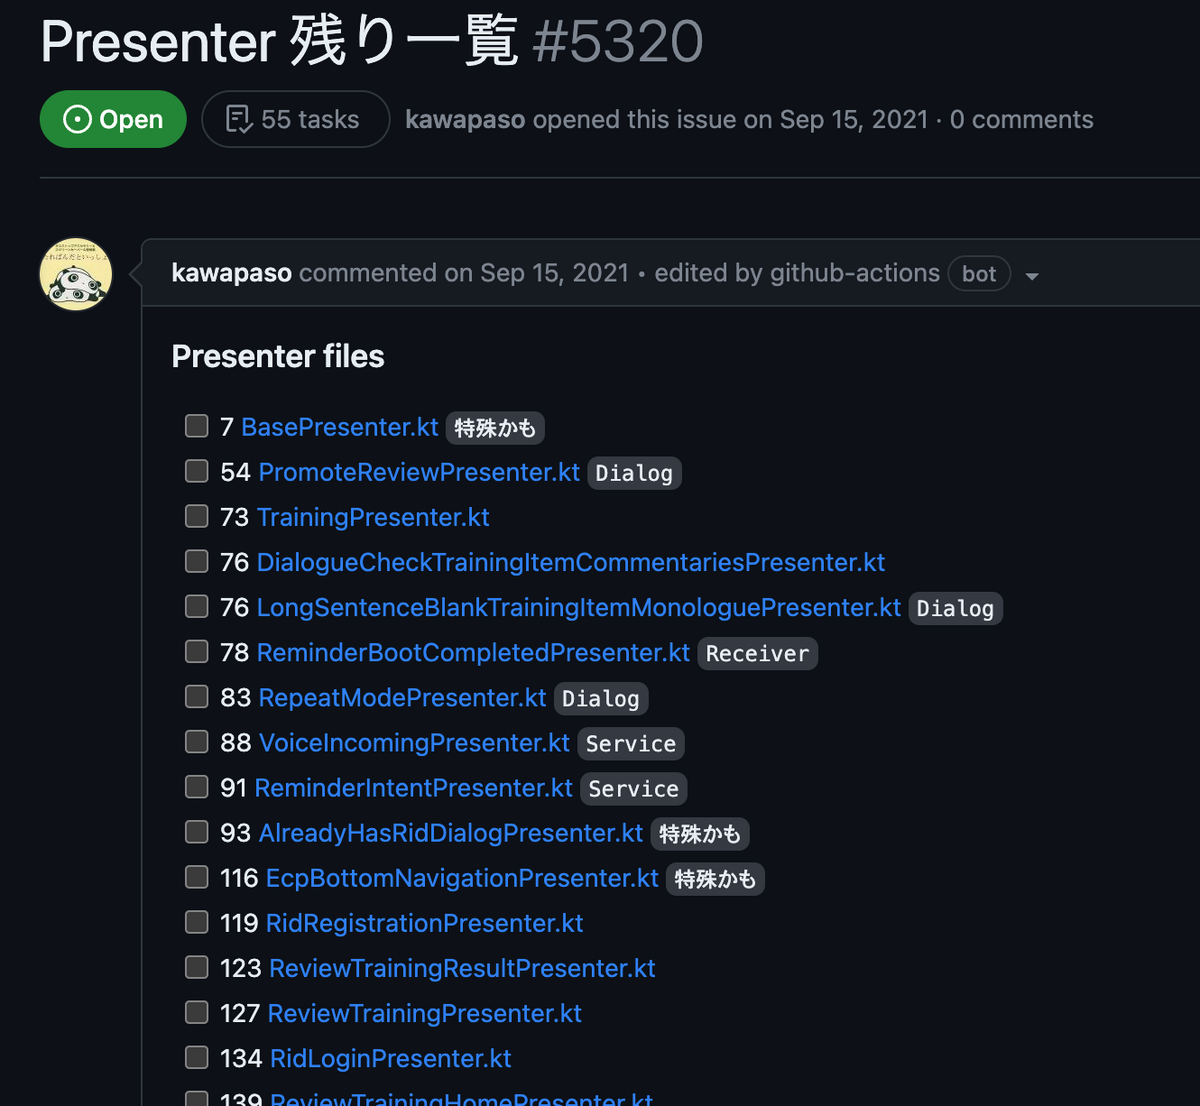
残りPresenter数の可視化マン
弊プロダクトではPresenterからViewModelへの移行を進めています。 移行モチベーションを上げるにあたり、残タスクの可視化のために毎週自動計測を行っています。
| Presenterの一覧 | Presenter数の推移 |
|---|---|
 |
 |
特定のGithub Issueに追記する形で履歴を残しています。 こちらも JavaScript で記載していきます。
- uses: actions/github-script@v6
  with:
    script: |
      const script = require('./.github/workflows/scripts/sync_issue_presenter.js');
      await script({ github, context, glob });
module.exports = async ({ github, context, glob }) => {
  const today = new Date().toLocaleDateString();
  const marker = '--DB--';
  const issue_number = [記載したいGithub Issue番号];
  const issue = await github.rest.issues.get({
    owner: context.repo.owner,
    repo: context.repo.repo,
    issue_number: issue_number,
  });

  const targetFilePaths = await (await glob.create('./**/src/**/*Presenter.kt')).glob();
  const checkedPresenters = [...issue.data.body.matchAll(/- \[x\] \d+ \[(.*).kt]/g)].map(x => x[1])
  const sortedPresenterInfos = targetFilePaths
    .map(path => { return { path: path, lineCount: lineCount(path), checked: checkedPresenters.some(presenter => path.includes(presenter)) } })
    .sort((a, b) => a.lineCount - b.lineCount);

  const records = JSON.parse(issue.data.body.split(marker)[1]);
  records.push({ date: today, count: targetFilePaths.length });

  const filesSection = `
### Presenter files </summary>

${sortedPresenterInfos.map(x => toMarkdownLink(x.path, x.lineCount, x.checked)).join('\n')}
</details>
  `

  const tableSection = `
| date | count |
| --- | --- |
${records.map(({ date, count }) => `| ${date} | ${count} |`).join('\n')}
  `

  // 前回までの履歴を引き継ぎたいので, issue上の文字列を雑にDBとして使っている
  const hiddenDbSection = `
<!--
${marker}
${JSON.stringify(records)}
${marker}
-->
  `

  await github.rest.issues.update({
    owner: context.repo.owner,
    repo: context.repo.repo,
    issue_number: issue_number,
    body: `
${filesSection}
${tableSection}
${hiddenDbSection}
    `,
  });
};

function toMarkdownLink(path, lineCount, checked) {
  const displayName = path.split('/').slice(-1)[0];
  const link = path.replace(/.*\/[REPOSITORY]\//, 'https://github.com/[ORGANIZATION]/[REPOSITORY]/blob/develop/');
  return `- [${checked ? "x" : " "}] ${lineCount} [${displayName}](${link})`;
}

const fs = require('fs');

function lineCount(path) {
  const fileBuffer = fs.readFileSync(path);
  const str = fileBuffer.toString();
  const splitLines = str.split("\n");
  return splitLines.length;
}
仕組み的にはファイル名を軸に数を数えているだけなので、状況によっては正確では無いかもしれませんがこの場ではある程度の目安がわかることが大事と考えています。 アーキテクチャ移行のような中長期的な取り組みに対しては、このような仕組みを先んじて組んでおくことで進捗管理もしやすくなり目標設定や振り返りにも役立つのでおすすめです。
ここからはスタサプ高校講座チームの取り組みをいくつか紹介します。
GooglePlayConsoleにaabをアップロードして、リリース・issue・タグを作成する
リリースする際に行うことになっている、「リリースの作成」「リリースissueの作成」「タグを打つ」作業を、aabアップロード後に自動的に行うようにしました。
まずは全体像から。
jobs:
  build-upload:
    name: build-upload
    runs-on: ubuntu-latest
    steps:
      - name: Prepare environment
        run: |
          echo "VERSION_NAME=$(echo ${{ github.ref_name }} | sed 's/release\///')" >> $GITHUB_ENV
          echo ${{ env.VERSION_NAME }}

      - name: Build and upload
        run: |
          echo "${{ secrets.GOOGLE_PLAY_SERVICE_ACCOUNT_JSON_BASE64 }}" | base64 --decode > app/api-project.json
          ./gradlew publishReleaseBundle

      - name: Retrieve short SHA
        run: echo "COMMIT_SHA=$(git rev-parse --short ${{ github.sha }})" >> $GITHUB_ENV

      - name: Prepare release note
        run: |
          sed -i -e "s/{date}/$(date '+%Y\/%m\/%d')/g" .github/release_issue_template.md
          sed -i -z 's/\n/@@/g' app/src/main/play/release-notes/ja-JP/default.txt
          sed -i -e "s/{release_note}/$(cat app/src/main/play/release-notes/ja-JP/default.txt)/g" .github/release_issue_template.md
          sed -i -z 's/@@/\n/g' .github/release_issue_template.md

      - name: Create release note
        run: gh issue create -t "[WIP][Android] StudySapuri リリースノート ver ${{ env.VERSION_NAME }}" -b "$(cat .github/release_issue_template.md)" -R quipper/aya-issues > release_issue_output.txt

      - name: Create release and tag
        run: gh release create ${{ env.VERSION_NAME }} -t "Release ${{ env.VERSION_NAME }}" --target ${{ github.sha }} -n "$(cat release_issue_output.txt)"
細かく見ていきます。
      - name: Prepare environment
        run: |
          echo "VERSION_NAME=$(echo ${{ github.ref_name }} | sed 's/release\///')" >> $GITHUB_ENV
          echo ${{ env.VERSION_NAME }}
私のチームでは、リリースブランチからリリースを行っていて、ブランチ名が release/バージョン名 となっています。
ワークフローをそのブランチから実行することになっているので、ブランチ名からバージョン名を抜き出すようにしています。
      - name: Prepare release note
        run: |
          sed -i -e "s/{date}/$(date '+%Y\/%m\/%d')/g" .github/release_issue_template.md
          sed -i -z 's/\n/@@/g' app/src/main/play/release-notes/ja-JP/default.txt
          sed -i -e "s/{release_note}/$(cat app/src/main/play/release-notes/ja-JP/default.txt)/g" .github/release_issue_template.md
          sed -i -z 's/@@/\n/g' .github/release_issue_template.md
リリースissueの元となるテンプレートファイル(release_issue_template.md)をバージョン管理していて、それの文字列を置換して完成させています。 アプリのバージョンアップ文言もバージョン管理されていて、それをテンプレートファイルに入れ込むようにしています。 改行を含んだ文字列をcatしてsedで置換することが難しかったため、関係ない文字(@@)に一度変換してテンプレートに流してから、最後に元に戻しています。
      - name: Create release note
        run: gh issue create -t "[WIP][Android] StudySapuri リリースノート ver ${{ env.VERSION_NAME }}" -b "$(cat .github/release_issue_template.md)" -R quipper/aya-issues > release_issue_output.txt
gh issue create コマンドを利用して、リリースissueを作成します。
先程作成したテンプレートを-b(body)に指定します。 また、チームではコードのリポジトリとissueのリポジトリが分かれているので、-Rを使って別のリポジトリにissueを作成しています。 また、作ったissueのURLが出力されるので、txtとして保存して次のstepで利用します。
      - name: Create release and tag
        run: gh release create ${{ env.VERSION_NAME }} -t "Release ${{ env.VERSION_NAME }}" --target ${{ github.sha }} -n "$(cat release_issue_output.txt)"
最後にリリースとタグの作成です。gh release create を用います。-nでリリースノートとしてissueのURLを記載します。
FirebaseAppDistributionにアップロードして、そのリリースのURLをプルリクに通知する
# ...省略
      - name: Execute Gradle assemble
        run: ./gradlew bundleRc

      - name: Upload aab to Firebase App Distribution
        id: firebase_outputs
        uses: wzieba/Firebase-Distribution-Github-Action@1.7.0
        with:
          appId: ${{ secrets.FIREBASE_DEV_APP_ID }}
          serviceCredentialsFileContent: ${{ secrets.FIREBASE_DISTRIBUTION_CREDENTIAL_FILE_CONTENT }}
          groups: group-hoge, group-fuga
          file: app/build/outputs/bundle/rc/app-rc.aab
          releaseNotes: "Release note sample."

      - name: Set firebase url to env
        run: echo "FIREBASE_URL=${{ steps.firebase_outputs.outputs.TESTING_URI }}" >> $GITHUB_ENV

      - name: Notify with Danger
        run: bundle exec --gemfile=Gemfile danger --dangerfile="script/ci/danger/notify_upload.Dangerfile" --danger_id='upload Rc aab' --remove-previous-comments
ビルドした後、Firebase App Distribution にアップロードするライブラリを使ってアップロードしています。
このライブラリでは最近アウトプットを受け取ることができるようになりました。 アップロードが完了したとき、Dangerでプルリクにコメントするため、TESTING_URI(テスターが当該リリースを開くことが出来るURL)をGitHubの環境変数に入れ、Dangerファイルから参照できるようにしています。 Dangerでは、渡されたURLとともにメッセージを送ります。
特定のブランチにpushされた場合に、2つのバリアントのaabをアップロードする(動的にmatrixを生成する)
チームのプロダクトには、ビルドバリアントとしてdebug, rc, releaseなどがあります。 master, develop, releaseブランチにpushがあったときにaabをアップロードするルールになっているのですが、
- releaseブランチのときは、rcとrelease両方をアップロードしたい
- それ以外の場合は、rcだけアップロードしたい
という要望がありました。 GitHubActionsで複数のバリアントを実行するにはmatrixが利用できますが、ブランチ名によってmatrixを動的に変更するジョブを作成したので紹介です。
name: Auto upload aab

on:
  push:
    branches:
      - master
      - develop
      - 'release/**'

jobs:
  prepare-matrix-values:
    runs-on: ubuntu-latest
    outputs:
      matrix_values: ${{ steps.set-matrix.outputs.value }}
    steps:
      - name: make Release matrix
        id: set-matrix
        run: |
          if [[ ${{ github.ref_name }} == release/* ]]; then
            MATRIX=[\"rc\",\"release\"]
          else
            MATRIX=[\"rc\"]
          fi
          echo "value=$MATRIX" >> $GITHUB_OUTPUT

  aab-upload-deploygate:
    needs: prepare-matrix-values
    name: aab-upload-deploygate
    runs-on: ubuntu-latest
    strategy:
      matrix:
        variant: ${{ fromJson(needs.prepare-matrix-values.outputs.matrix_values) }}
    steps:
      - name: echo for confirming
        run: echo ${{ matrix.variant }}
# ...matrixを使ってビルドやアップロードを行う
matrixは動的に指定できるようになっていて、配列をjsonで受け渡しすることで実現することが出来ます。
最初のjob prepare-matrix-values でoutputにjsonを入れています。
パターンが限られるため直書きで配列を生成していますが、shellの配列を使ったり、文字列をjqでフォーマットして生成することも出来ます。
まとめ
いかがでしたか。けっこうなボリュームになりましたが、実際にはこの記事で紹介したものよりももっと多くのタスクが GitHub Actions で自動化されています。 タスクの大小に関わらず自動化をすることでエンジニアが日々のルーチンの作業から解放され、結果的に生産性を向上させることができると思っています。 この記事がヒントになれば幸いです。