こんにちは、Androidエンジニアの@morux2です。本記事ではJetpack Composeでスポットライト機能を実装する方法を紹介します。
はじめに
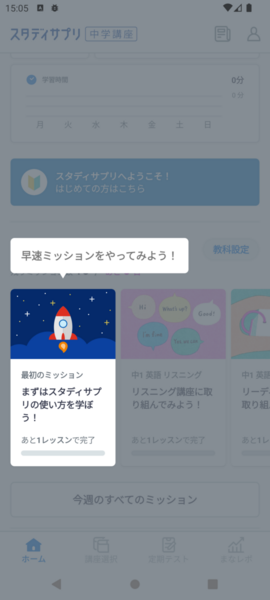
スポットライトは、特定の要素を目立たせることでユーザーの行動を促す機能です。スタディサプリ中学講座のオンボーディング画面にも採用されており、現在カスタムViewからの移行を進めています。
今回は実装を3つのステップに分けて紹介します。
実装の3ステップ
- 画面全体を半透明の黒いViewで覆う
- スポットライトを当てたい要素の長方形の座標を取得する
- 取得した座標に沿って黒いViewを切り抜く
参考にさせていただいた記事はこちらになります。
スポットライト機能の実装
1. 画面全体を半透明の黒いViewで覆う
まずCanvasを使用して半透明の黒いViewを作成します。
@Composable
fun Spotlight() {
    Canvas(modifier = Modifier.fillMaxSize()) {
        drawRect(Color.Black.copy(alpha = 0.8f))
    }
}
2. スポットライトを当てたい要素の座標を取得する
次にOnGloballyPositionedModifierをスポットライトを当てたい要素に対して使用します。今回はboundsInRootでルートのComposableを基準にした長方形の座標を取得しています。
@Composable
fun SampleScreen() {
    var targetRect by remember { mutableStateOf<Rect?>(null) }

    Target(
        modifier = Modifier.onGloballyPositioned { coordinates ->
            targetRect = coordinates.boundsInRoot()
        }
    )
}

@Composable
fun Target(modifier: Modifier = Modifier) {
    Text(
        modifier = modifier,
        text = "Hello Android"
    )
}
3.取得した座標に沿って黒いViewを切り抜く
最後にclipPathを用いて切り抜きます。ClipOp.Differenceを指定することで領域が減算されます。
@Composable
fun Spotlight(targetRect: Rect) {
    Canvas(modifier = Modifier.fillMaxSize()) {
        val spotlightPath = Path().apply {
            addRect(targetRect)
        }
        clipPath(
            path = spotlightPath,
            clipOp = ClipOp.Difference
        ) {
            drawRect(Color.Black.copy(alpha = 0.8f))
        }
    }
}
この時、Pathの指定によって楕円や角丸のスポットライトを当てることも可能です。
val spotlightPath = Path().apply {
    addOval(targetRect)
}

val spotlightPath = Path().apply {
    addRoundRect(
        RoundRect(
            rect = targetRect,
            cornerRadius = CornerRadius(16.dp.toPx())
        )
    )
}
完成!
あとはスポットライトを重ねてあげれば完成です!
@Composable
fun SampleScreen() {
    var targetRect by remember { (mutableStateOf<Rect?>(null)) }

    Box(modifier = Modifier.fillMaxSize()) {
        Target(
            modifier = Modifier.onGloballyPositioned {
                targetRect = it.boundsInRoot()
            }
        )
        targetRect?.let {
            Spotlight(targetRect = it)
        }
    }
}

スポットライトが当たっている領域だけを操作可能にする
現状の実装ではスポットライトの裏側の要素をタップできるようになっているので、ユーザーが意図しない行動を取れてしまいます。そこで、スポットライトの内側のみタップを有効にする処理を加えていきます。
detectTapGesturesを用いてタップされた座標を取得し、それがスポットライトの長方形の座標の内側かどうか計算することで実現可能です。
@Composable
fun Spotlight(targetRect: Rect) {
    Canvas(modifier = Modifier
        .fillMaxSize()
        .pointerInput(Unit) {
            detectTapGestures(onTap = {offset ->
                if (targetRect.contains(offset)) {
                    // スポットライトがクリックされた時の動作を指定
                }
            })
        }) {
        // 以下省略
    }
}
スポットライトに装飾やアニメーションをつける
ここからはスポットライトに装飾やアニメーションを加えて動きをリッチにしていきます。
スポットライトが当たっている要素から相対的な位置に装飾を配置する
スポットライトを注目させるために文字や矢印を配置したいケースがあるでしょう。そんな時はLayoutModifierを利用します。配置したい装飾の幅と高さ・スポットライト領域の座標を組み合わせて計算をすることで、相対的な位置を指定することができます。
@Composable
fun Spotlight(targetRect: Rect) {
    Box {
        Canvas(modifier = Modifier.fillMaxSize()){
            // 以下省略
        }
        GuideLabel(targetRect = targetRect)
    }
}

@Composable
fun GuideLabel(targetRect: Rect) {
    Text(
        modifier = Modifier.layout { measurable, constraints ->
            val placeable = measurable.measure(constraints)
            layout(placeable.width, placeable.height) {
                placeable.placeRelative(
                    // スポットライトを基準にラベルをセンタリング
                    x = (targetRect.topLeft.x + (targetRect.width - placeable.width) / 2).toInt(),
                    // スポットライトの上に16dpのpaddingを空ける
                    y = targetRect.topLeft.y.toInt() - (placeable.height + 16.dp.toPx().toInt())
                )
            }
        },
        text = "Click Here",
        color = Color.White
    )
}
スポットライトをフェードインさせる
AnimatedVisibilityを用いると簡単にフェードインのアニメーションを実現できます。
@Composable
fun SampleScreen() {
    var targetRect by remember { (mutableStateOf<Rect?>(null)) }

    Box(modifier = Modifier.fillMaxSize()) {
        Target(
            modifier = Modifier.onGloballyPositioned {
                targetRect = it.boundsInRoot()
            }
        )
        targetRect.let {
            AnimatedVisibility(
                visible = it != null,
                enter = fadeIn(tween(5000))
            ) {
                Spotlight(targetRect = it)
            }
        }
    }
}
スポットライト領域をアニメーションで広げる
animateSizeAsState関数を使ってスポットライト領域をアニメーションさせてみます。
@Composable
fun Spotlight(targetRect: Rect) {
    var startAnimation: Boolean by remember { mutableStateOf(false) }

    val animatedSize: Size by animateSizeAsState(
        targetValue = if (startAnimation) targetRect.size else Size.Zero,
        animationSpec = tween(1000),
        label = "spotlight"
    )
    // 中心から放射状に広がるアニメーション
    val deltaX = animatedSize.width / 2
    val deltaY = animatedSize.height / 2
    val animatedRect = Rect(
        left = targetRect.center.x - deltaX,
        top = targetRect.center.y - deltaY,
        right = targetRect.center.x + deltaX,
        bottom = targetRect.center.y + deltaY
    )

    LaunchedEffect(targetRect) {
        startAnimation = true
    }

    Canvas(modifier = Modifier.fillMaxSize()) {
        val spotlightPath = Path().apply {
            addRect(animatedRect)
        }
        clipPath(
            path = spotlightPath,
            clipOp = ClipOp.Difference
        ) {
            drawRect(Color.Black.copy(alpha = 0.8f))
        }
    }
}
さいごに
いかがでしたでしょうか?個人的には想定していたよりも手軽に見通しよく実装できたと思っています。ぜひ皆さまも試してみてください。 github.com
スタディサプリでは、一緒に最高のプロダクトを作っていってくれる仲間を募集しています! 少しでもご興味がある方はこちらのページからご連絡ください! brand.studysapuri.jp